|
Building An Internet Controlled Security
Robot
contact: shelato at aol.com (add "Security
Robot" to email subject line)
New!
- Visual Basic Motion Detection Programming
Click here for project download
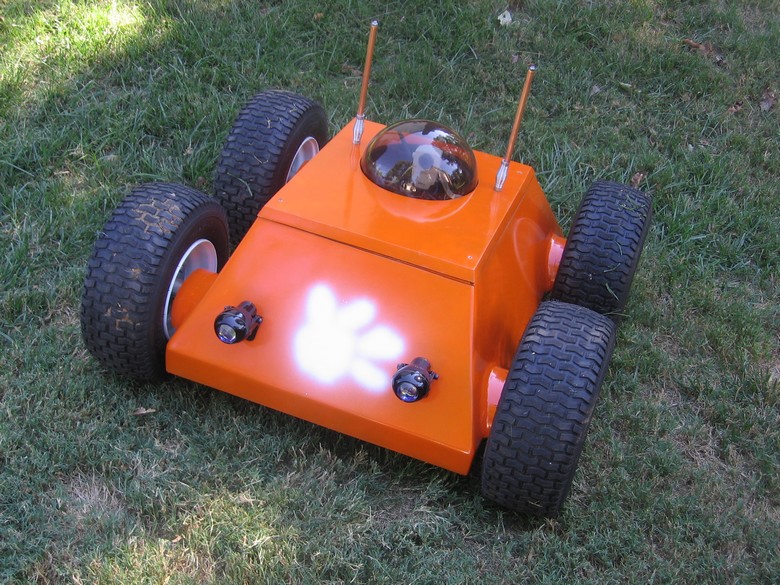
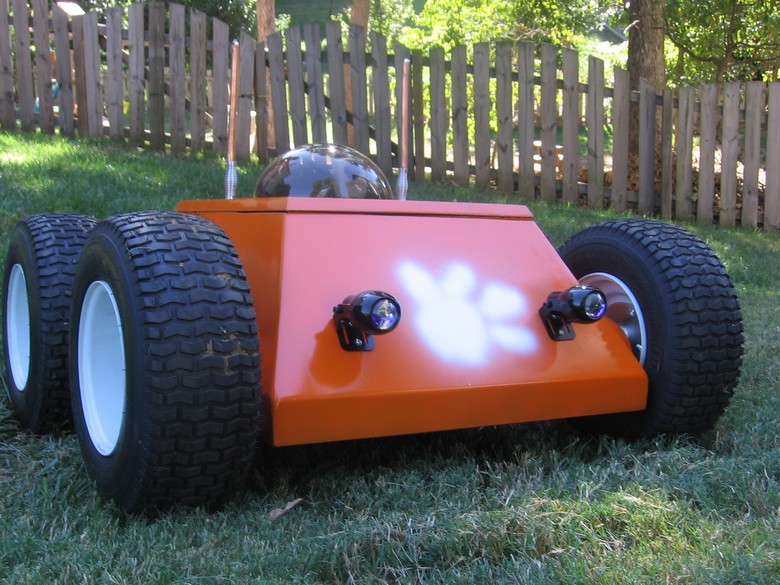
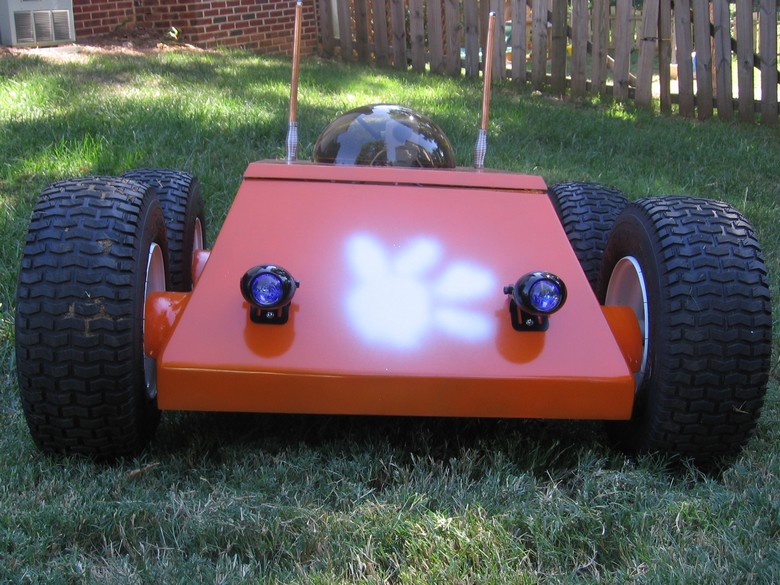
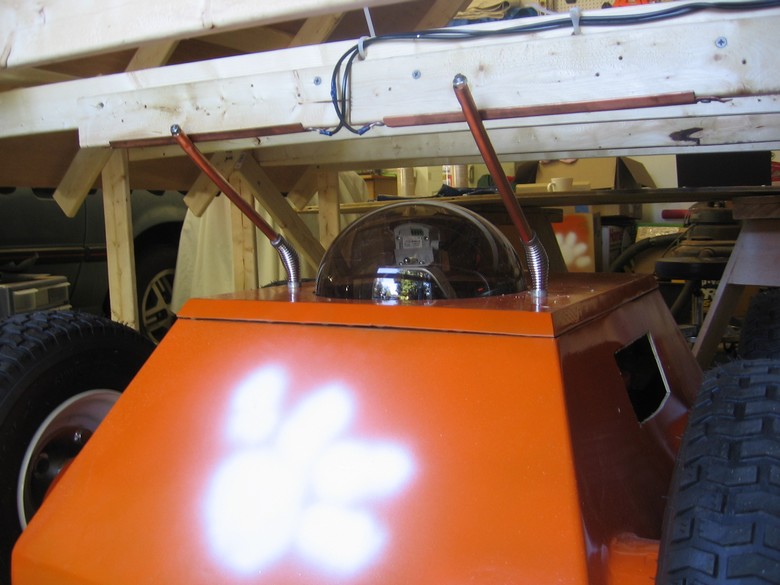
Third Generation
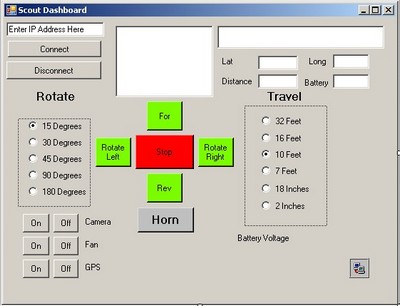
4 Wheel Drive Internet
Controlled Rover
We've lowered the overall
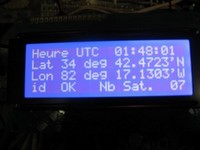
profile and given Turtle (or should it be Tiger), a new paint job. We have
also added a GPS unit. The GPS feeds signals to the CUBLOC micro
controller which sends the location back to the controlling pc on the internet.
Jump to File Downloads & Video Programming Lessons
Youtube Movie Of Turtle Entering Garage
http://www.youtube.com/watch?v=OO2IDl-Q-6k
http://www.youtube.com/watch?v=j7GL-4toIXI
Turtle GPS - In French
|
 |

|
|
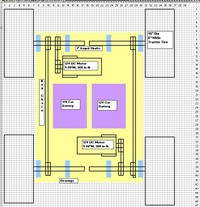
Rover Plan |
Solid Animation
|
 |
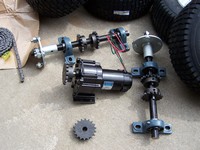 |
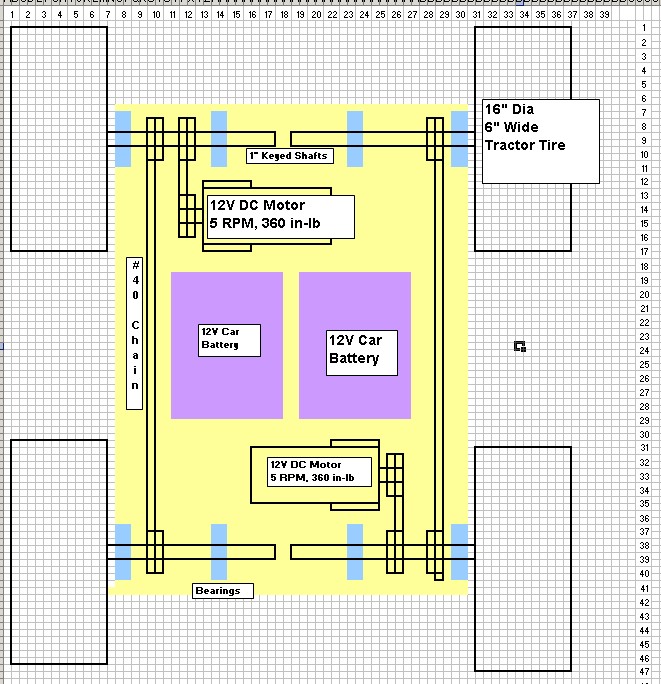
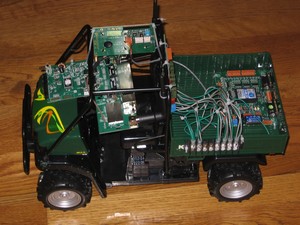
Drive Components for Gen 3
click photo to enlarge |
Drive Components for Gen 3 |
Second Generation Internet Robot Now Functional
|
 |
|
 |
 |
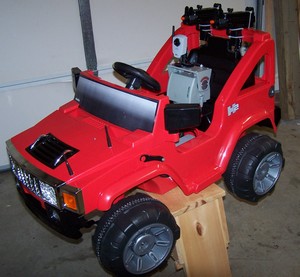
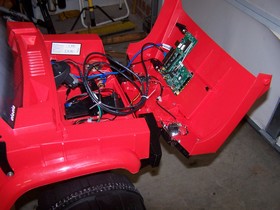
| Kids Electric Car |
Kids Electric Car
Ebay $100 |
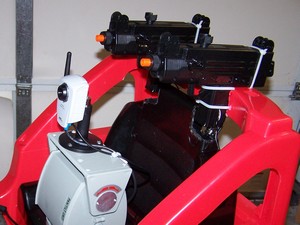
Camera & Guns
Axis 207M Camera |
Camera & Guns
Electric Airsoft Guns |
|
 |
 |
 |
 |
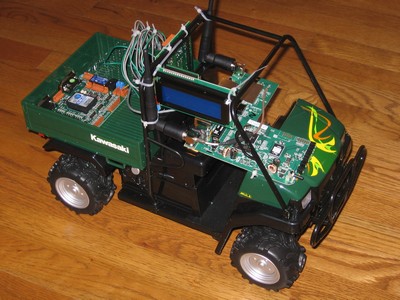
Linksys Router
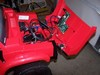
Under the hood |
Digital License |
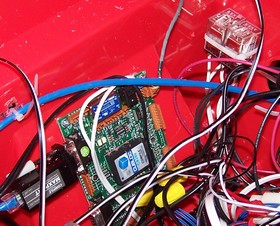
Cubloc Micro Controller |
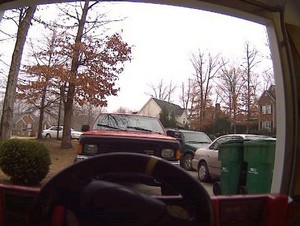
Camera View
Steering wheel visible |
|
New File Downloads &
Video Lessons
On Creating A Web Page To Control Your Microcontroller:
The Videos are all "wmv" files. Select From Pull Down Below.
Included in the videos above are video lessons on setting up a Linksys
Router with DD-WRT firmware and creating a router bridge.
The Project:
Build a security robot that can be controlled and viewed over the internet.
The planned final version will be a kids 48" electric car with a network camera
attached. The onboard Linksys router will transmit the camera and micro
controller signals to a second Linksys router attached to the cable internet at
the remote location.
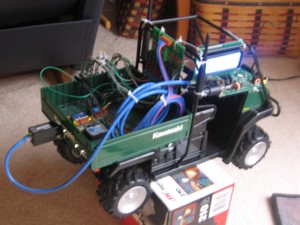
1/4 Scale Trial Version:
I opted to try this out with a $20 RC car from Wal-Mart first, before I
invest $200 in a kids car.
Parts:
Linksys WRT54G Router - Used as the wireless connection from Bestbuy
Comfiletech:
Industrial Micro Controller/PLC "Cubloc"- I'm using the industrial kit
for all my projects, but you can purchase the parts separately:
The
Industrial Kit
Maxport: Ethernet to RS232 converter with web server.
Maxport or
Comfiletech Home Page
Kowasaki RC car from Wal-Mart
Camera: None yet. The network camera draws about 2 amps at 12VDC.
When I scale up to the kids car I'll have enough power.

David Shelato - Clemson University
|
|
Setting up the Router Bridge
See video lessons above for demonstration
This is the key to
the project. I needed the router to
"bridge" to my home router, so it could act as the wireless modem.
While I could transmit directly from my laptop to the router on the car, my goal
is to control a security robot via the internet. In the video above, the
laptop is talking to my home wireless router, not directly to the router on the
car. I've already tested it over the internet from a coffee
shop. The onboard router connects to the micro controller via the
Maxport
server, and will connect to a network camera in the future.
We purchased a $49 Linksys WRT54G router from Best Buy and flashed new DD-WRT
firmware into the router. This is open source firmware that teaches the router
new tricks, like bridging and significantly increasing the power. What a hassle
though. It turns out the new routers have less memory than the old ones and
several steps are required. The risk is turning your new router into a "brick".
At any rate it worked. Here are the instructions:
Flashing a Linksys WRT54G with DD-WRT Firmware:
http://www.dd-wrt.com/wiki/index.php/Linksys_WRT54G/GL/GS/GX
Note: If you are using a new Linksys Router, V.5 or higher, you will need to
follow these special instructions to flash the new firmware because the new
routers have less memory.
http://www.dd-wrt.com/wiki/index.php/Flash_your_WRT54G_or_WRT54GS_v5_series_%28v5%2C_v5.1%2C_v6%29
Setting Up The Bridge:
http://www.dd-wrt.com/wiki/index.php...Bridge#Example
or Follow These Instructions:
Setting Your 2nd Router Up as a Bridge.
Connect to the router with an Ethernet Cable. If your computer has a
wireless connection to your primary router, turn off the wireless connection.
Otherwise, going to IP 192.168.1.1 will take you to your primary router, not the
one you want to work on.
Logon to the router that has been flashed with DD-WRT
From your browser go to
http://192.168.1.1
User: root
password: admin
Select Basic Settings from the
top menu bar
Change Connection Type to Disable
Change STP to Disable
Change IP to 192.168.1.2
Check the Assign WAN to Switch
check box
Change DHCP Server to Disable
Save
Wait for the router to reboot, then
log back on using http://192.168.1.2
Select The Security Tab
Change SPI Firewall to Disable
Save
Select Basic Settings Tab from
Wireless Menu
Change Wireless Mode to Client
Bridge
Change Wireless Net Mode to match
your primary router. For me it's Mixed
Enter the Name of your primary
wireless router. For me it's Home
Save
Select Wireless Security
Security Mode - Match your primary
router. For me it's WEP
Encryption - Match your primary
router. For me, 64 bits
Enter the Key
Save
Select Wireless Advanced Settings
Change Authentication to Shared
Key
Save
Select Wireless from the
Status Tab
Click the Site
Survey Bottom at the bottom of the page
Find your primary
router and click the Join button at the right
That's it. You are
now bridged. If your primary router is connected to the
internet you should now be able to access the internet through the
bridged router.
|
|
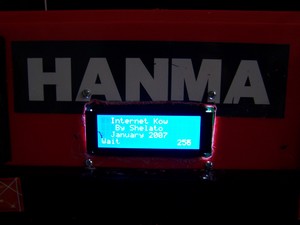
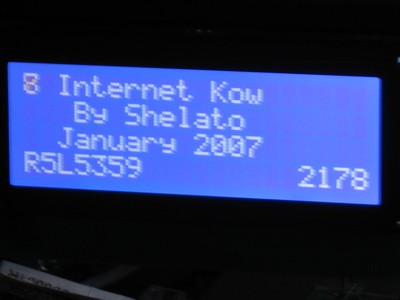
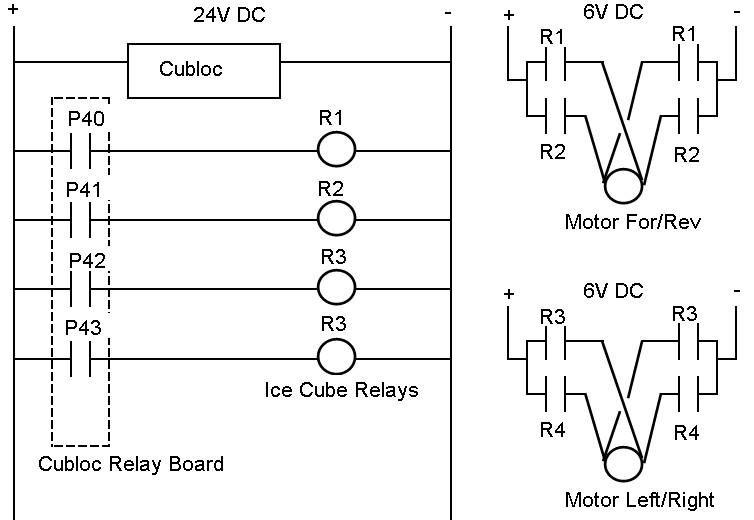
Cubloc Program The micro
controller program is very simple:
Const Device=cb280
Set Ladder Off
Set Display 2,0,0,128
'***********************************************************************
Dim x As Integer
Dim a As String * 10
Dim TurnTime As Integer
Dim DirTime As Integer
Dim Dir As String
Dim Turn As String
Dim DirTimeStr As String * 1
Dim TurnTimeStr As String * 1
Opencom 1,115200,3,200,200
'Open Channel
Set Until 1,4
On Recv1 Gosub DATARECV
' JUMP to DATARECV_RTN when data is received
' Clear send/receive buffers
Bclr 0,2
'***********************************************************************
a = "OhMy"
TurnTime = 500 ' Turning Time
DirTime=1000 'Time forward or
backwards
'Erase screen
x=0
Cls
Delay 100
Csroff
Locate 2,0
Print "Internet Kow"
Locate 3,1
Print "By Shelato"
Locate 2,2
Print "January 2007"
Locate 0,3
Print "Wait"
Do
Delay 50
x=x+1
Locate 16,3
Print Dec x
Loop
DATARECV:
'***********************************************************************
If Blen(1,0) > 0 Then '
if there is at least 1 byte in the buffer
a=Getstr(1,4) ' Get 1 byte
'Debug a
Dir=Left(a,1)
DirTimeStr=Mid(a,2,1)
DirTime=Val(DirTimeStr)*500
Turn=Mid(a,3,1)
TurnTimeStr=Right(a,1)
TurnTime=Val(TurnTimeStr)*400
x=1
'Cls
Delay 50
Locate 0,3
Bclr 1,0
If Turn = "L" Then
'Activate relays for Left Turn
' Make sure the relays are all off before switching poles
Out
41,0
Out
42,0
Out
40,1
Out
43,1
Elseif Turn = "R" Then 'Activate relays for
Right turn
Out 40,0
Out 43,0
Out 41,1
Out 42,1
Endif
If Dir
= "F" Then 'Activate relays to move forward
' Make sure the relays are all off before switching poles
Out 45,0
Out 46,0
Out 44,1
Out 47,1
Elseif Dir = "R" Then 'Activate
relays for reverse move
Out 44,0
Out 47,0
Out 45,1
Out 46,1
Endif
Delay TurnTime
' Make sure the relays are all off before switching poles
Out
40,0
Out
43,0
Out
41,0
Out
42,0
Delay DirTime-TurnTime
' Make sure the relays are all off before switching poles
Out 44,0
Out 47,0
Out 45,0
Out 46,0
Endif
'***********************************************************************
Print a
Return
End
| |
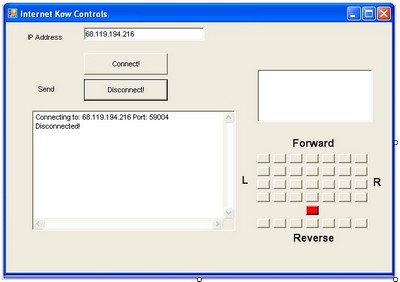
| Visual Basic Program
Very Important Note:
You must add the MSWINSCK.ocx
control to use the winsock functions in visual basic. Follow the simple
instructions at this site:
Link
One More Note: To add a Winsock
component to the VB Express Toolbar, select Tools from the menu bar, then
select Choose Menu Items, Click the COM tab, scroll down the list to
Microsft Winsock Control, check the box and close it out. Then go to
the ToolBox and you will find the Winsock component at the bottom of the
toolbox.
Again, this is a pretty simple modification to the zedomax
temp program. I only included a few of the buttons, as they are all
the same with the exception of the 4 character command they send to the
cubloc program:
Option
Strict Off
Option
Explicit On
Imports
VB = Microsoft.VisualBasic
Friend
Class frmMax
Inherits System.Windows.Forms.Form
Dim start As
Integer
Dim dcnt As
Integer
Private Sub
frmMax_Load(ByVal eventSender
As System.Object,
ByVal eventArgs As System.EventArgs)
Handles MyBase.Load
Text2.Text = ""
End Sub
Private Sub
Command1_Click(ByVal eventSender
As System.Object,
ByVal eventArgs As System.EventArgs)
If Winsock1.CtlState =
MSWinsockLib.StateConstants.sckConnected Then
Call Winsock1.SendData("Dwight")
End Sub
Private Sub
Command2_Click(ByVal eventSender
As System.Object,
ByVal eventArgs As System.EventArgs)
Handles Command2.Click
If Winsock1.CtlState <>
MSWinsockLib.StateConstants.sckClosed Then
Winsock1.Close()
Text1.Text = "68.129.184.226" 'This is the
default IP address of my router
Winsock1.RemoteHost = Text1.Text
Winsock1.RemotePort = 59004
Winsock1.LocalPort = 0
Winsock1.Connect()
Mprint("Connecting to: " & Text1.Text &
" Port: " &
"59004")
End Sub
Private Sub
Command3_Click(ByVal eventSender
As System.Object,
ByVal eventArgs As System.EventArgs)
Handles Command3.Click
If Winsock1.CtlState <>
MSWinsockLib.StateConstants.sckClosed Then
Winsock1.Close()
Mprint("Disconnected!")
End Sub
Private Sub
Winsock1_ConnectEvent(ByVal eventSender
As System.Object,
ByVal eventArgs As System.EventArgs)
Handles Winsock1.ConnectEvent
Mprint("Connected!")
End Sub
Public Sub
Winsock1_DataArrival(ByVal eventSender
As System.Object,
ByVal eventArgs As
AxMSWinsockLib.DMSWinsockControlEvents_DataArrivalEvent)
Handles Winsock1.DataArrival
Dim rdata As
String
rdata = "whatever"
If eventArgs.bytesTotal > 4
Then
Call
Winsock1.GetData(rdata)
Text3.Text = rdata
End If
End Sub
Sub Mprint(ByRef
strm As String)
Text2.SelectionStart = Len(Text2.Text)
Text2.SelectedText = strm & vbCrLf
System.Windows.Forms.Application.DoEvents()
End Sub
Private Sub
Text1_TextChanged(ByVal sender
As System.Object,
ByVal e As System.EventArgs)
Handles Text1.TextChanged
End Sub
Private Sub
Button3_Click(ByVal sender
As System.Object,
ByVal e As System.EventArgs)
Handles Button3.Click
If Winsock1.CtlState =
MSWinsockLib.StateConstants.sckConnected Then
Call Winsock1.SendData("F2R3")
End Sub
Private Sub
Button12_Click(ByVal sender
As System.Object,
ByVal e As System.EventArgs)
Handles Button12.Click
If Winsock1.CtlState =
MSWinsockLib.StateConstants.sckConnected Then
Call Winsock1.SendData("R2L1")
End Sub
|
| |
| |
|
|
|